45 how to create a return label on shopify
How To Create A Return Shipping Label In Shopify? Step 1: Open your Shopify store, and navigate to settings>shipping. Step 2: Now click on Returns and Exchanges and then choose Create Return Label. Step 3: In the Order Number field enter the exact number you want to create the label for. Step 4: Now in the Return Reason field fill the reasons and enter the tracking information. Printing Shopify Shipping labels · Shopify Help Center On this page Printing shipping labels with customs forms and packing slips Print your shipping labels Print shipping documents separately Printing shipping labels with customs forms and packing slips You can print your shipping labels together with your customs forms and packing slips.
Buying and managing Shopify Shipping labels If your default location is in the United States and your business accepts returns, then you can also create and send return labels in your Shopify admin. Tip To see more videos, visit our YouTube channel . In this section Buying shipping labels individually using Shopify Shipping Buying shipping labels in bulk using Shopify Shipping
How to create a return label on shopify
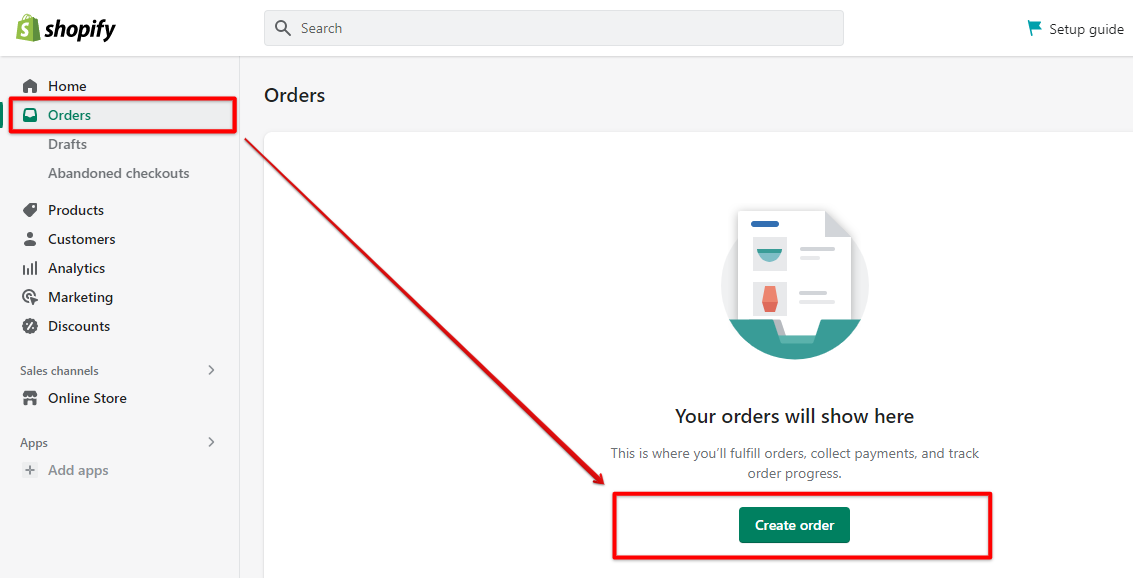
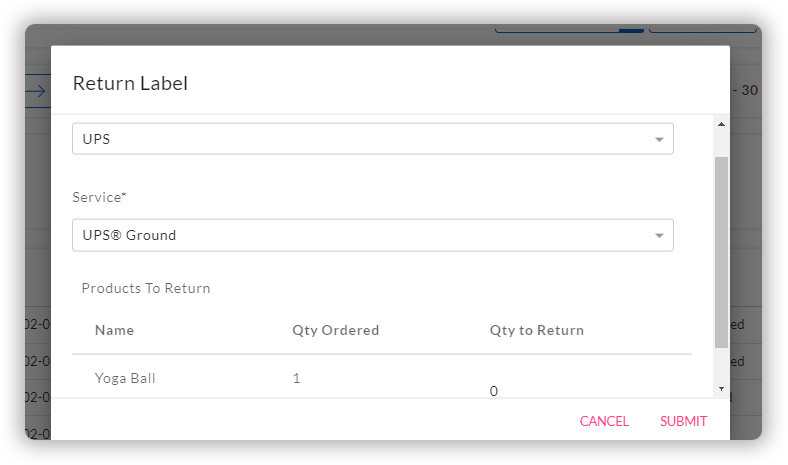
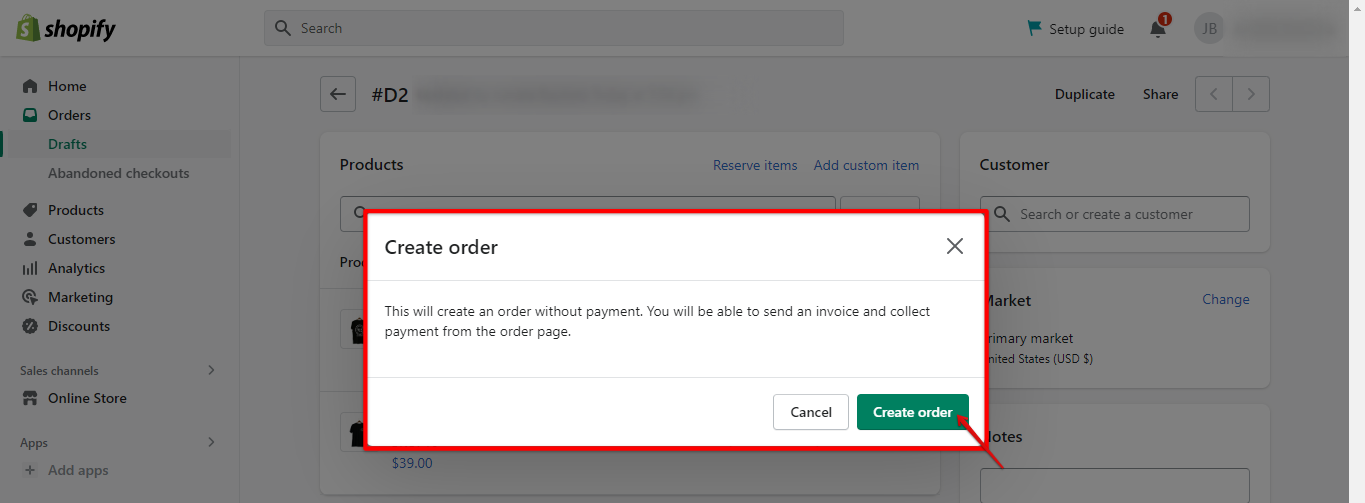
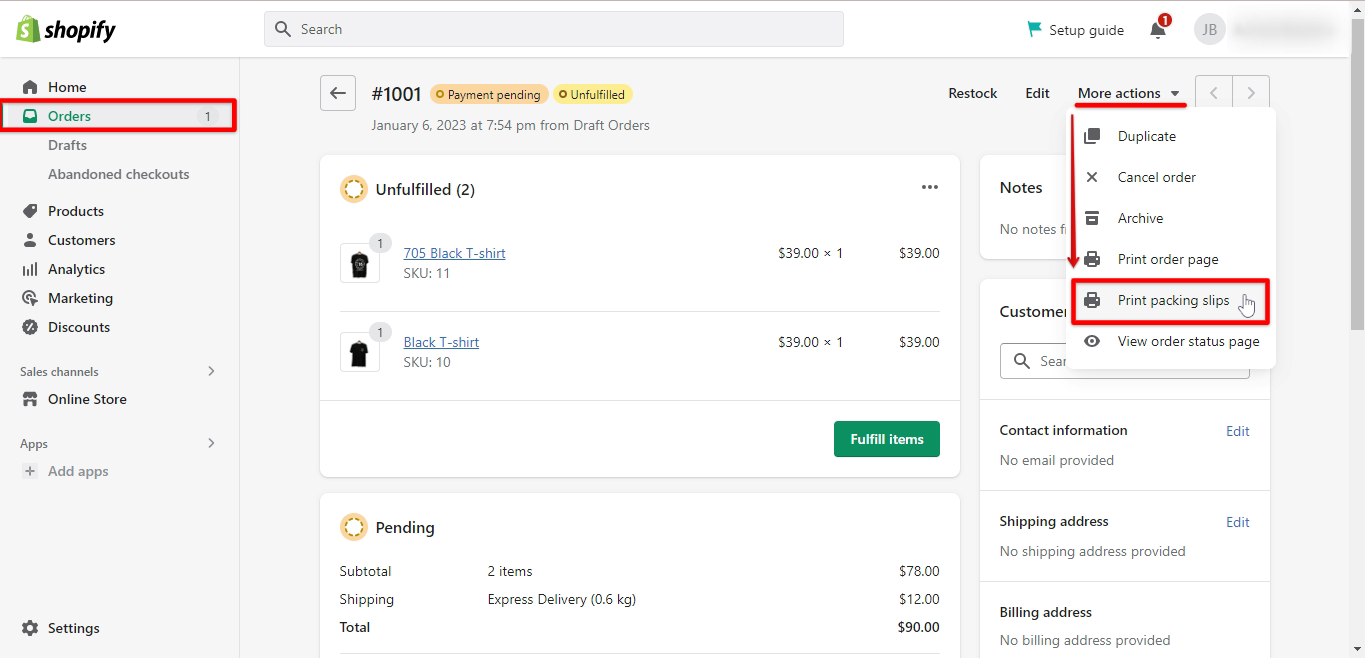
How To Create Canadian Return Labels For Shopify - ReturnZap Add a direct link to an externally hosted return shipping label Copy and paste in the tracking number and shipping carrier for the package Optional - Create a return and issue a refund when shipping is not required for the item The Shopify upload flow for Canadian return labels Pros: Same benefits of option #3 above how to create a return label on shopify - tthunt.com Sometimes items need to be returned and refunded to your customers.,With Shopify, the return process is streamlined.,Learn how to create and send return labels to your customers in this video.,If you haven't yet, consider adding information about returns to your refund policy in your,Shopify store.,Check out the link below for more details on ... How to Create Return Labels in Shopify : The Upper Ranks Step #1: Go to the "Orders" page in your Shopify admin. Step #2: Select an order from the list. Step #3: Click on "More Actions" and choose "Create Return Label" from the drop-down menu. Step #4: Choose a return shipping method. Step #5: Decide how you want to give the label to the customer. Email the customer.
How to create a return label on shopify. How To Write a Return Policy (+ Free Template) (2023) - Shopify Return labels are automatically emailed to customer as soon as the merchant clicks "create return" Merchants can manage a return from the original order, keeping all order history in one place. Once the returned item is received, the buyer can easily be refunded using the original payment method. Get started with return management 3:15 How to Generate Return Labels for eCommerce? [2023] 3 Easy Steps to Make Your Own Return Labels in 2023. Step 1: Pick a Shipping Carrier and Mailing Option. Step 2: Specify the Desired Address. Step 3: Pay the Postage Fees. 2 Main Methods Used to Provide Return Labels for eCommerce. Embedding the Return Label Within the Parcel. Enabling Consumers to Undertake Printing the Return Labels. How Do I Create a Return Form in Shopify? To get started, log into your Shopify admin and go to the "Settings" page. From there, click on the "Checkout" tab and scroll down to the "Return Policy" section. In the "Return Policy" section, you will see a field where you can enter your return policy details. Changing and voiding Shopify Shipping labels iPhone Android From your Shopify admin, go to Orders. Click the order with the shipping label that you want to void. In the Fulfilled section, click the ..., and then click Void label. Select a reason for voiding the label. Click Void label and insurance to confirm. Void shipping labels in bulk
How to Make a Return Policy on Shopify - YouTube If you're running an e-commerce store on Shopify, having a clear and effective return policy is essential for building trust with your customers and ensuring... How to create a return shipping label in Shopify Click Create return label. Select how you want to share the return label with your customer. 11. Click Done. I find it easier to follow step-by-step tutorials if they are in a video format. So if you're like me, you'll find this video guide very helpful. How to Create Return Labels for Your Customers In Shopify - Swim Bike Mom Create a Fake "Return" Product that Costs $0. What I mean by this is that you need to make a fake product because you can't apply two discount codes. So go to Shopify and log into your account. Create a new product and name it something you'll remember like "Fake Product" or "Return Label." Make the product cost $0. You will ... how to create a return label in shopify - tthunt.com Let's move on to the first section of how to create a return label in shopify Let TThunt's experts help you find the best TikTok product on your Shopify business! Find TikTok products (It's Free)
How to create and send return labels || Shopify Help Center Sometimes items need to be returned and refunded to your customers. In this video you'll learn how to create and send return labels on your Shopify store. Essential Shopify Checklist ||... 5 Steps to Create a Return Shipping Label in Shopify - ReturnLogic Blog 5 Steps to Create a Return Shipping Label in Shopify Shopify enables you to sell online to anyone, anywhere, at anytime. It empowers your business to truly compete with the ecommerce giants. But, as you may know, not every online purchase turns out as planned. Returns are a natural, healthy and essential aspect of ecommerce. Buying Shopify Shipping return labels · Shopify Help Center Click Create return label. Select the way that you want to share the return label with your customer: Confirm your customer's email and click Email customer . Click Copy link and send it separately in an existing email or message thread. Click Print label and send it with the order. Click Done. Return Labels Guide: Making Return Labels for Ecommerce | ShipBob Here's how it works: 1. Generate a return label from your ShipBob dashboard with a single click. With ShipBob, you have the option to generate and print a return label through our dashboard. Simply search and select the item (s) you want to return. 2.
Can You Create a Shipping Label Without an Order on Shopify ...
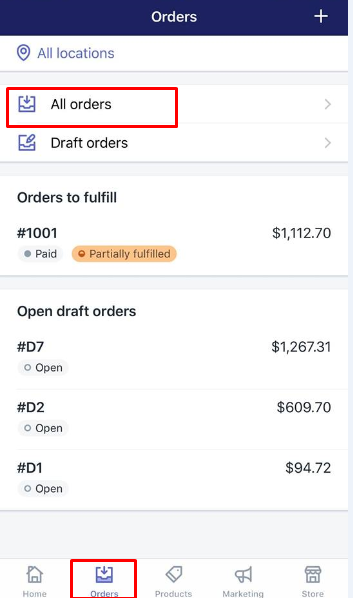
How to create a Shopify return - ReturnZap Initiating a return for a Shopify order. When logged in as a store admin, navigate to the order you wish to return by using the Orders tab on the left hand nav and clicking on the customers order. If there are multiple items in the order: From the order detail page, find "Return Items" along the top of the page, between the "Refund" and ...

How To Create And Send Return Shipping Labels || Shopify Help ...
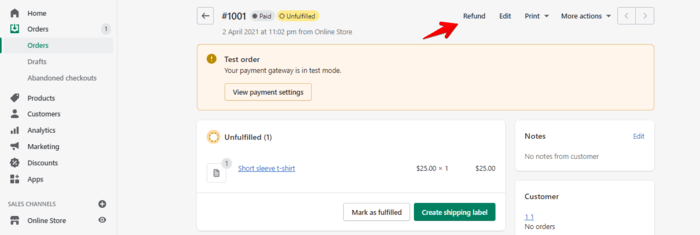
Creating returns and refunds · Shopify Help Center From your Shopify admin, go to Orders. Click the Open tab to display all open orders. Click Filters. Click Select filter, and then select Return status. Click Select value, and then select Return in progress or Returned to display the returned orders. Cancel a return
How to Handle Shopify Returns: Everything You Need to Know
How Do I Send a Return Label on Shopify? Sending a return label on Shopify is easy! Follow these steps: 1. Log into your Shopify account and go to Settings. 2. Under the General tab, scroll down to the Return Policy section and click Manage. 3. On the Return Policies page, click the Create Policy button. 4. Enter a Name, Description, and Refund Type.

New feature: Create a return label to your Shopify order ...
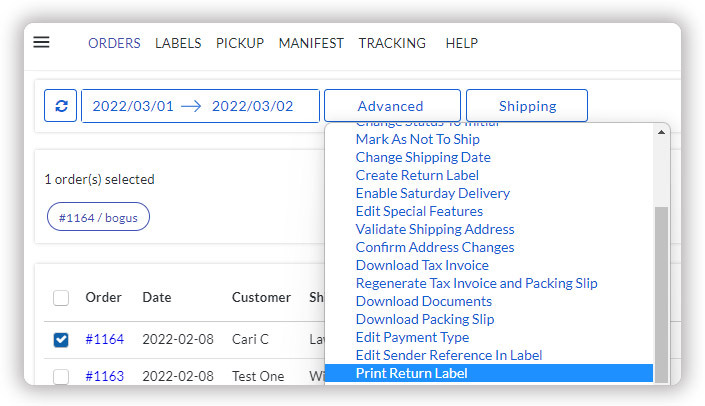
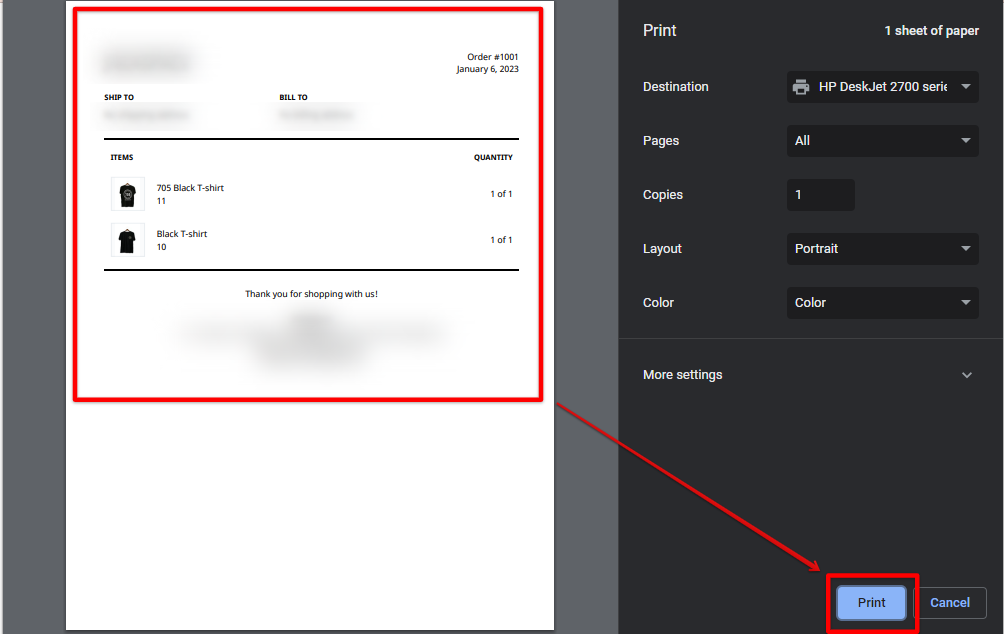
How To Create Return Shipping Label For eCommerce Store? All you need to do is select the "Print Return Label" option from the 'Advanced' section. Refer to the image to understand it better: You can create a return shipping label for almost all the top shipping carriers like UPS, FedEx, Purolator, DHL, and so on. Here is one sample Return Shipping Label for your reference :
What is Shopify Shipping and How Does it Work? - Sellbrite
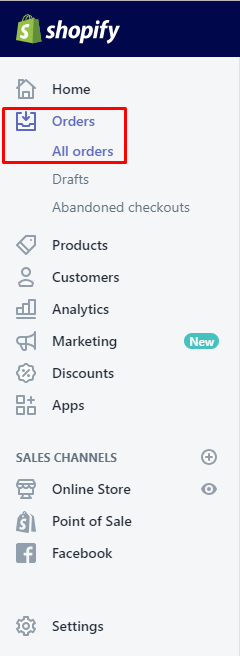
How Do I Create a Return Label in Shopify? 1. From your Shopify admin, go to Settings > Shipping. 2. Under Returns and Exchanges, select Create return. 3. In the Order number field, enter the order number for which you want to create a return label. If you don't know the order number, you can find it in the order details. 4. In the Reason for return field, enter the reason for the return.
How to Customize Your Shopify Store Emails, Theme, Domain, a
Return Shipping Labels (Canada) - Shopify Community You can integrate your own Canada Post account, generate return labels for any of the orders, display the rates at checkout, print shipping labels and also automate shipment tracking. You can try the app with a 14-day free trial and contact the support for any assistance required. Customer Success @ PluginHive
10 Best Shipping Apps for Shopify - Adoric Blog
Shipping Label Template: Custom Printable Shipping Labels - Shopify Shopify's free shipping label template is the easiest way to generate shipping labels for your retail business. Fill in the required information and generate a shipping label on the spot. Just print it on sticker paper and affix it to your box!

Complete Guide to set up Shopify Shipping Profile in 5 ...
How To Create And Send Return Shipping Labels || Shopify Help Center How To Create And Send Return Shipping Labels || Shopify Help Center Shopify Help Center 181K subscribers Subscribe 298 Share 50K views 4 years ago Shipping with Shopify || Shopify...
How To Create Return Shipping Label For eCommerce Store?
Cancel an order's return label - Shopify Community First things first - when you create a return label in Shopify, you are only charged if the customer actually prints the label, takes it to the shipping company, and the return shipper scans the label's bar code (see the Shopify Help Center article Return labels, in the section "Pay for return labels").
Can You Create a Shipping Label Without an Order on Shopify ...
How to Create Return Labels in Shopify : The Upper Ranks Step #1: Go to the "Orders" page in your Shopify admin. Step #2: Select an order from the list. Step #3: Click on "More Actions" and choose "Create Return Label" from the drop-down menu. Step #4: Choose a return shipping method. Step #5: Decide how you want to give the label to the customer. Email the customer.

Printing Shopify Shipping labels · Shopify Help Center
how to create a return label on shopify - tthunt.com Sometimes items need to be returned and refunded to your customers.,With Shopify, the return process is streamlined.,Learn how to create and send return labels to your customers in this video.,If you haven't yet, consider adding information about returns to your refund policy in your,Shopify store.,Check out the link below for more details on ...
How To Change The Default Shopify Cost Label For Free ...
How To Create Canadian Return Labels For Shopify - ReturnZap Add a direct link to an externally hosted return shipping label Copy and paste in the tracking number and shipping carrier for the package Optional - Create a return and issue a refund when shipping is not required for the item The Shopify upload flow for Canadian return labels Pros: Same benefits of option #3 above
How to Void a Shipping Label on Shopify
![How Does Shopify Shipping Work? A Complete Guide for You [2022]](https://litextension.com/blog/wp-content/uploads/2022/10/Shopify-Shipping.png)
How Does Shopify Shipping Work? A Complete Guide for You [2022]

How To Create And Send Return Shipping Labels || Shopify Help ...
Can You Create a Shipping Label Without an Order on Shopify ...
How To Create Return Shipping Label For eCommerce Store?
![How Does Shopify Shipping Work? A Complete Guide for You [2022]](https://litextension.com/blog/wp-content/uploads/2022/09/image14-2.webp)
How Does Shopify Shipping Work? A Complete Guide for You [2022]

How to create a Shopify return - ReturnZap
)
Print Shipping Labels - AfterShip Shipping Features

Creating UK Return Labels For Shopify Orders - ReturnZap

How To Create And Send Return Shipping Labels || Shopify Help Center
![How To Change Shipping From Address On Shopify? [2022] - LogBase](https://uploads-ssl.webflow.com/611167e7889c927aebfd8ee2/62d5a3c6b10f0bc3cebbfa75_H_3KOLf60rc-xg_azR7CWenmopoF4yWvZw0KER5jrArKHceq3UcakHF-NhwS2t1ZtWbfw-7ErNr9ErEEyHYtBBj_ZsBnzEQ_qmV5oCfmch2MixHvhkkVOviD2fHSghrdTjuM6HQiTzdRbcoouHz5FoQ.jpeg)
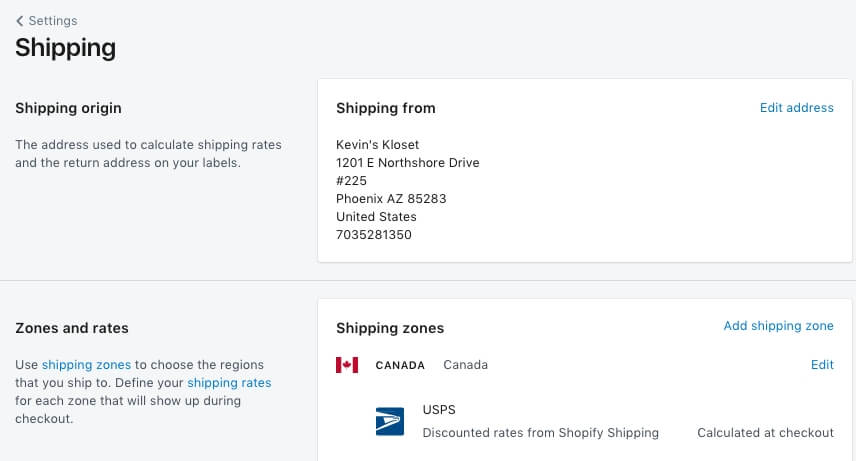
How To Change Shipping From Address On Shopify? [2022] - LogBase
How To Create Return Shipping Label For eCommerce Store?
Can You Create a Shipping Label Without an Order on Shopify ...

Free Shopify Refund Policy Template

How to create a Shopify return - ReturnZap
How to Print a Shipping Label on Shopify in 7 Simple Steps
FedEx Return Shipping on Shopify store - PluginHive

Now You Can Print USPS Shipping Labels in Shopify
Can You Create a Shipping Label Without an Order on Shopify ...

How to Create Return Labels in Shopify - The Upper Ranks
The #1 shipping integration for Shopify - Sendcloud
Shopify Shipping: Pros, Cons & How It Works | Flowium

BIXOLON SOHO Series Slim Shipping Label Printer - Thermal ...

Generate Return Labels - Loop Returns Help Center
What is Shopify Shipping and How Does it Work? - Sellbrite
Give Your Customers Store Credit on Shopify (You Can't But ...
Creating UK Return Labels For Shopify Orders - ReturnZap

MUNBYN Thermal Label Printer, 4x6 USB Thermal Shipping Label Address Postage Printer Compatible with Amazon, UPS, Ebay, Shopify, FedEx Labeling, One ...

Create a 2nd shipping label for an order - Shopify Community
![How Does Shopify Shipping Work? A Complete Guide for You [2022]](https://litextension.com/blog/wp-content/uploads/2022/09/image10-3.webp)
How Does Shopify Shipping Work? A Complete Guide for You [2022]
![How To Change Shipping From Address On Shopify? [2022] - LogBase](https://uploads-ssl.webflow.com/611167e7889c927aebfd8ee2/62d6586170c0a98c70911f4a_Change%20Shipping%20From%20Address.jpg)
How To Change Shipping From Address On Shopify? [2022] - LogBase

10 Best Shipping Label Apps for Shopify in 2022

ReturnZap - Shopify Returns App
Post a Comment for "45 how to create a return label on shopify"